You
get the colors in the pharmacy in 10 or 20g bags.
The 10g bags cost 30 cents for example.
 |
|
Foto:
Regina F. Rau,
eggs
from the Paracelsus Pharmacy in Geretsried
|
If
you do not like the chemical colors, you can dye
eggs with natural materials. The stain from chemical
colors often gets into the eggs white - and especially
allergics often are very sensitive to it. Colorings
with natural colors from nature - for example, from
the garden - allthough are not as strong, but they
are very free from side effects.
There
are many vegetables, herbs and teas from the kitchen
and out of the garden, with which you can achieve
very good results. At the pharmacy you can achieve
more natural colors with natural dyes - you can
get them very cheap.
important:
Always use eggs from hens. Their coats are
thicker and stronger. First, the chickens are happier
and healthier. Secondly, the eggs are healthier
- and they taste much better - and they are better
suitable for dyeing.
If
you take white
eggs, the colors are very brilliant and bright.
But it also works beautifully with brown
eggs. The Colors become slightly warmer and darker.
The
eggs must be free of grease before dyeing, so it
is advisable to degrease them first with vinegar
or dishwashing liquid. Fat-free eggs take the colors
much better.
Tip
Before adding the water you can pour the colors
with 70% isopropyl alcohol - 20 ml -. Or you are
adding alum.
Colors become much more intense.
Have
fun with dyeing your Easter-Eggs
Here
athe the natural colors from kitchen and garden
|
Here
are the natural colors from kitchen and garden
|
|
Dyeing
|
|
1.
How to produce the dyebath:
Cut
the rough parts of plants (eg carrots, beetroot,
etc. - cut, chop, grate, mash with a mortar...
Produce the dyebath accordingly to the information
below. Some commodities - such as bark and dried
berries must be pre-soaked. From the fresh plants,
such as beets, spinache, carrots, etc. - the dyebath
can be made immediately. The Dyebath must be filtered
out after cooking.
2.
cook the eggs before dyeing (thoroughly cleaned
before - with vinegar or dishwashing liquid)
3.
Rinse the eggs immediately with cold water after
cooking and but them into the cooled or still
lightly warm (not hot) dyebath for about half
an hour (depending on how intense you want the
color). For soft and pastel colors - a short bath
may be enough. Strong tones require some patience.
Take the eggs out every now and then with a spoon
and check the color. If the eggs have the desired
color, remove and place them on a cloth to dry
them. Thus, later the eggs will not have color
rings at the support point.
If you have dyed blown out eggs, let the color
immediately run out - and rinse the egg under
cold running water.
4.
Rub the colored eggs with a few drops of olive
oil - or sunflower oil - or other food-oil. Thus,
the color gets bright and - and the eggs shine
pretty!
|
|
Most
colors can be intensed by certain additives:
| Addidives |
Effect |
| alum |
color
gets more intensive |
iron
nail,
or iron salt |
darkens
the color, especially green and yellow |
| vinegar |
lightens
the color |
| potash
/ potassium carbonate |
strengthens
the color |
|
| ingredience
for the color-bath |
| coloring-material |
quantity
for 2liters water |
soaking-time |
cooking-time |
| fresh
plants- vegetables |
500g
|
- |
30-40
minutes
|
| leaves/flowers/berries |
30-100g
|
few
hours
|
30-60
minutes
|
| roots/barks/woods |
30-100g
|
1-2
days
|
1-2
hours
|
| powder |
3-4
tea spoon
|
30
minutes
|
30
minutes
|
| tea/coffee |
30-50g
|
- |
20-30
minutes
|
|
The
given values are guidelines by which you
can align yourself
|
|
|
|
yellow
|
orange
|
brown
|
|
colors
|
| Birch
leaves (wilted) |
yellow
green |
| Nettle
leaves |
yellow
green |
| Elderberry
leaves |
yellow
green to brownish |
| Mate
tea (hot) |
light
yellow |
| Apple
leaves |
yellow |
| Goldenrod
herb, leaves |
yellow |
| Saffron |
yellow |
| Lilacs
(blossoms) |
yellow |
| Chamomile
flowers |
yellow |
| Maple
leaves (red, yellow) |
golden
yellow |
| Carrots |
orange
yellow |
| Marigold
flowers (dried) |
beige |
| Oak
bark |
brown |
| Hazel
leaves |
brown |
| Coffee |
brown |
| Tea |
brown |
| Onionskin |
brown |
|
|
|
red
colors
|
| natural
|
staining |
| Beetroot |
purple |
| Red
cabbage leaves |
purple |
| Hibiscus
(red) |
red |
| Black
Currants |
roan
(reddish-grey) |
| Apple
tree bark |
reddish |
| Birch
bark |
reddish |
|
|
blue
colors
|
| natural |
staining |
| Elderberry
(including juice) |
grayblue,
black |
| Bilberry
(including juice) |
grayblue |
| Hibiscus
(blue) |
grayblue |
|
|
green
colors
|
| natural |
staining |
| Ivy
leaves |
greenish |
| Horsetail |
green
yellow |
| Spinach |
green |
| Parsley |
green |
|
| |
|
|
Natur-colors
from the pharmacy
available
in pharmacies from 10 g bags for 30 cents
|
Here
are the natur-colors from the pharmacy
|
|
Dyeing
|
| |
|
Also
here - obey the points just like written
above
- with the garden and kitchen-nature-colors.
Needed quantities
You find the quantities in the light-orange
box above.
Preparation
of the color-bath - most
of the colors are used as follows:
put the content of the bag into a glas.
Let it soak for about 10 minutes. Pour it
with 350 ml hot Water, boil briefly - then
cook it for about 5-10 minutes together
with the eggs. If stronger color is desired:
let the coloring-bath soak over night. Boil
the coloring-bath again the next day once
again - and strain it. Apply the freshly
cooked and still hot eggs in this coloring-bath
and turn them slightly, until they have
the desired color-intensity. Walnutshell:
soak
before - 1/2 Stunden einweichen.
For
Color-Intensification
as in the above List (yellow)
|
|
Gelb
|
Orange
|
Braun
|
|
colors
|
| Safflower
herb, safflower |
yellow,
can also go to reddish |
| Yellow
Wood |
yellow
orange |
|
Curcuma root (turmeric) |
orange
yellow |
| Agrimony
herb |
reddish
yellow |
| Yellow
Reseda |
yellow |
|
|
|
red
colors
|
| natural |
staining |
| Brazil
wood-, Redwood-chips |
pink,
purple, maroon |
| Madder
|
red,
maroon |
| Pernambucowood
chips |
pink |
| Ratanhiaroot |
sandalwood-color
pinkish-brown |
| Red
Sandalwood |
sandalwood-color,
pinkish-brown, vermilion |
|
|
blue
colors
|
| natural |
staining |
| Waid
(vat dye) |
blue,
purple, black |
| Campechewood-,
Logwood- chips |
blue
- purple |
|
|
green
colors
|
| natural |
staining |
| Rue
herb |
greenish
yellow |
| Hyssop |
greenish
yellow |
| Mateblätter |
lindgrün-hell,
lindgrün dunkel |
| Wermutpflanzenkraut |
grünlichgelb |
|
| |
|
|
Source
/ Dyeing:
Johannis-Apotheke
(Geretsried) and
Weidenborn-Apotheke (Marburg-Einhause)
and www.farbenundleben.de
Decoration of the eggs:
©
Regina
F. Rau
|
|
Decoration
of the eggs
© by Regina Rau
|
Decoration
of the eggs
© by Regina Rau
|
|
|
|
Patterns
and Ornaments
 |
 |
|
Foto
and Design: ©
Regina
F. Rau
|
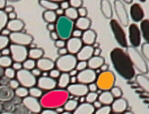
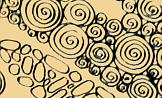
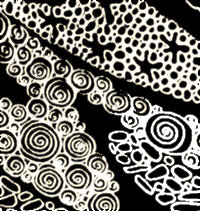
Paint
ornaments, signs or names on the surface
of your egg - either with ink pen or with
technical-drawing ink pen (i.e. such as
Rotring (German tool)). Therefore I take
China ink or ink for technical drawing.
I paint circles in different sizes or shapes,
elypses, spirals ... or I combine triangles,
circles, rectangles and elypses in or above
each other - or side by side; with dots
and dashes in between. At least I color
only some of them with bright red, blue,
green, turquoise colors. This looks really
very pretty and are real eye-catchers!
 |
|
Foto
and Design: ©
Regina
F. Rau
|
Scratching
technique:
All
you need is eggs with a thick shell. They
can either be white or brown - and you can
also dye them before scratching. When the
color has dried, you scratch ornaments and
decorations, or names and hearts with a
penknife or a sharp knife blade into the
surface of your egg. I use an electric
mini drill from Dremel (German
manufacturer) with adjustable speed and
using various abrasive papers. But you can
also use fine handicraft files.
Woolen threads on eggs
 |
 |
|
Foto
and Design: ©
Regina
F. Rau
|
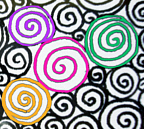
Apply
a 2mm wide film of liquid adhesive on the
surface of your egg. Lay your woolen thread
(can also be cotton or any other fine material)
beginning from the bottom to the top - or
from the top to the bottom (as you like)
in a spirale. You can cut the thread every
now and then - and change the color, which
should be in a big contrast to the previous
one (i.e. blue - yellow / green - red /
yellow - lilac / white - black...) The thread
from the second row must touch the thread
from the first row. Do this until the egg
is fully covered. This
looks very pretty! Or stick spirals of various
colors to the egg, lining the background
with other colored threads.
Colorful scraps
Tear the tracing paper into very small pieces
Stick this motley pieces as you want on
the surface of your egg - or make some landscapes:
for example: green mountains, blue sky and
yellow sun. Colorful flowers - and stick
the free spaces with a single color and
overlapping pieces.
Speckled eggs
|
|
|
Foto
and Design:
© Regina
F. Rau
|
Speckle
the colors with a toothbrush through a strainer,
sprinkle on the eggs. After drying this
color you can also apply more colors. But
always dry the color first, before you put
on a new one!
Egg with hatching chick
Cut the egg very carefully open with a small
knife - where the blow-hole for the egg
is. Do this peace for peace, so that nearly
the half - or at least one third of the
egg is broken away. You can leave the edges
- this looks more real! Paint those edges
with a very thin black pen over - and paint
some fine shell breaks on the surface of
the egg, too.
Wrap a pom-pom with yellow wool. You wrap
a yellow wooden thread around two fingers
(about 20-30 times - depends on how thick
your wool is), so that you make an eight
(8). Tie the woolen threads with a strong
twine (or other tie) together, where the
two circles of the eight around your fingers
meet. Maybe somebody could help you - this
would it make much easier!
Then
you cut the loops at the most left and at
the most right. Tug the resulting wollen
balls a little bit. Cut a beak out with
a scissor from orange felt or paper and
form it a bit. stick it with some adhesive
to the yellow woolen ball. Make two eyes
with black wool. Therefore you knot the
woolen thread two or three or four times
at the same place (depends how big your
ckick is - and how thick the woolen thread
is. The eye should be adäquate to the
size of the chick). Cut off the knot from
the woolen thread - and make a second one.
Paste them tho the chick. Put and paste
the finished
chick now into the open egg. Do this very
carefulle, that it does not break further.
This egg looks very pretty and is a real
eye-catcher!
Have
lots of fun with coloring and decorating
your eggs!
|
| |
|
|
 Deutsch
 English
 Türkçe
 Español
 Français
 Italiano
 Nederlands
 Polski
 Português
 Русский
 Deutsch
 English

 Glücks-Coaching Friedensbotschafterin
 brauchst Du die Zugangsdaten.
Die bekommst Du auf email-Anfrage von mir: regina.rau(at)gmx.net
